1.
Description
The first step of the incident response is to image the
suspicious system and get the hash of the DD image, which can prove the status
of the suspicious system don’t get any modifications. Keep in mind that the less changes on the suspicious system,
the better.
2.
Requirement
1)
USB sticker, 8G or greater. It will be used to
boot the system with a customized Linux to make the image.
2)
USB External hard drive. Recommend 1T or
greater. It will be used to save the image.
3)
PALADIN EDGE 64 (Version 8.01) ISO
(https://sumuri.com/product/paladin-edge-64-bit/). The tool is available for FREE. However, it is highly recommended a donation to support the project.
4)
Rufus 3.8 or later (https://rufus.ie/)
3.
Make a bootable USB Sticker with Paladin Edge
tool
1)
On a test laptop (not the suspicious laptop), download Paladin Edge 64-bit
ISO from https://sumuri.com/product/paladin-edge-64-bit/
2)
Download Rufus from https://rufus.ie/
3)
Insert the USB sticker. Run Rufus, select the
device and ISO file (Boot selection), leave other options as default setting.
Click “Start” button to start making the bootable USB.
4.
Make DD image of the suspicious system
DD file is a disk image file and replica of a hard disk
drive. It is widely used on Forensics investigation.
Keep in mind that the less changes on the suspicious system,
the better.
1)
Shutdown the suspicious computer or make it
sleep as soon as possible to maintain the environment.
2)
Find out how to boot from a USB drive on the
suspicious laptop. Different laptop might have different methods.
3)
Use the ThinkPad T480s as the example:
4)
Attach the USB sticker to the system via any
available USB port.
5)
Power on the system. Press F12 immediately as
the Thinkpad logo appears.
6)
There should be a pop-up menu with a list of
choices. Select the USB drive using the arrow key and press Enter.
7)
The system should now boot from the USB sticker
(if not, try to disable “secure boot” on BIOS setup).
8)
On the screen, select the first option: “Sumuri
Paladin Live Session – Forensic Mode” and press Enter.
9)
Wait until the OS loaded. Connect the External
Hard Disk to an available USB port.
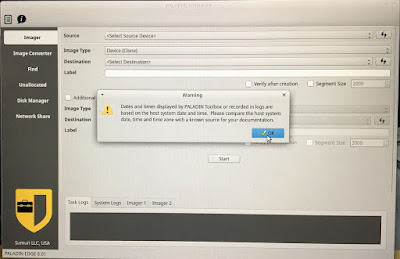
10) Click
the first icon “Paladin Toolbox”
11) There
might be a warning about the time synchronization. Adjust the host system time
if needed. Click OK button to continue.
12) Click
“Source” dropdown list, select the Laptop’s hard drive.
13) Click
“Image Type” dropdown list, select “DD(RAW)”
14) Click
“Destination” dropdown list, select the External Hard drive.
15) Enter
the label name, and click “Start”
16) After
image is done. Open the .log.hashes to check the hash
17) Now
you have a DD image with the hash. You can mount it as read-only hard drive to
perform the forensics.
Also refer to:
1)
Making Image of a laptop – Summary (https://andyinmatrix.blogspot.com/2022/01/making-image-of-laptop-summary.html
)
2)
Paladin
Edge 64 (https://andyinmatrix.blogspot.com/2021/03/making-image-of-laptop.html
)
3)
Kali
Linux (https://andyinmatrix.blogspot.com/2022/01/making-image-of-laptop-part-2.html
)
4)
FTK
Imager (https://andyinmatrix.blogspot.com/2022/01/making-image-of-laptop-part-3.html
)


