Monday, August 30, 2021

Fix the MacBook Big Sur slowness

I used to be able to run 3 VMs on Vmware Fusion at the same time on Catalina. After I upgraded my MacBook Pro to Big Sur, even 1 vm could cause slowness. If I run the vm along with Teams or Zoom meeting, it simply stopped responding. I couldn’t even move the mouse sometimes. 


My MacBook is Pro 2019, 32G memory, 2 video cards. CPU: 2.3GHz, 8-Core Intel Core i9. This configuration is not that bad.


I googled and found many users have the same problem. And there were many solutions. However, I’ve tried all of them, including but not limited:

1.    Disable "Enable hypervisor applications in this virtual machine"

2.    On the guest windows, on settings > Windows Security > device security > turn off “Memory integrity”

3.    Modify the .vmx file (https://communities.vmware.com/t5/VMware-Fusion-Discussions/VMware-Fusion-12-1-0-Big-Sur-Host-Windows-10-Guest-Running-Slow/m-p/2814913/highlight/false#M170980)

4.    Set windows.vbs.enabled = "FALSE"

5.    Use Parallels but it seems to have the same problem.


After many attempts, I am thinking of moving back to Catalina, however, it means a lot of work because I didn’t have the backup in Time-Machine. 


It would be better if the issue could be solved in Big Sur so I don’t have to rollback. 


I started my investigation. So far in my MacBook Pro, there were 4 applications that could cause the slowness: VMware Fusion, (Parallels), Teams, Zoom. I noticed whenever the slowness happened, there was a process call “kernel-task” that has more than 1000%CPU usage and the fan was running like crazy. 


I googled what “kernel-task” is really doing, on Apple support site (https://support.apple.com/en-ca/HT207359), it mentioned: 


Activity Monitor might show that a system process named kernel_task is using a large percentage of your CPU, and during this time you might notice more fan activity. 

One of the functions of kernel_task is to help manage CPU temperature by making the CPU less available to processes that are using it intensely. In other words, kernel_task responds to conditions that cause your CPU to become too hot, even if your Mac doesn't feel hot to you. It does not itself cause those conditions. When the CPU temperature decreases, kernel_task automatically reduces its activity.


So, I think, if I cool down the laptop, maybe this process won’t use that much CPU resources. 


I bought a laptop cooling pad, it helped, now I can run 1 vm without any slowness. However, I still couldn’t run more than 1 vm at the same time. 


I need a stronger cooler, so I took a First Aid Ice pack from the refrigerator and put it under the laptop. Now, I can run 3 vms at the same time again.


I think maybe Apple changed the way of how the process “kernel_task” be triggered on Big Sur to better protect the CPU. but it causes the whole system to be slow.

Saturday, July 31, 2021

Linux Forensics - Some Artifacts


Target: Red Hat Enterprise Linux Server release 7.6 (Maipo)


Tools:

1.     SANS SIFT Workstation: https://digital-forensics.sans.org/community/downloads

2.     Log2timeline

3.     Aureport

4.     Lnav: https://lnav.org/

5.     Stat

6.     Cat

7.     Grep

8.     Lastb

9.     Last

10.  Chrootkit

11.  Rkhunter

12.  Clamav

13.  Lynis: https://cisofy.com/lynis/


Offline investigation

1.     Mount the victim DD image on SIFT Workstation.

2.     Antivirus scan with clamAV

1)    Update ClamAV:

a.     sudo systemctl stop clamav-freshclam.service

b.     sudo freshclam

2)    Scan the image: clamscan -r -i DIRECTORY


3.     Rootkit scan with Chkrootkit

1)    Install:

# apt-get update

# apt install chkrootkit

# chkrootkit -V


2)    Scan: # chkrootkit -r /mnt/ ; This will check all files under this specified directory.


4.     Build timeline

1)    sudo log2timeline.py victim.plaso /media/sansforensics/

2)    sudo log2timeline.py -z America/Toronto victim.plaso /media/sansforensics/

3)    search key word:

a.     USER_PROCESS IP Address

b.     User:

c.     terminal=ssh res=success

5.     aureport offline check:

1)    Install: sudo apt install auditd

2)    Load the offline logs: aureport --input

6.     Check suspicious file info: stat filename

7.     A few cat commands:

cat /var/log/secure-yyyymmdd | grep "authentication failure" | more

cat secure- yyyymmdd | grep "user NOT in sudoers"

cat secure- yyyymmdd | grep "failed - POSSIBLE BREAK-IN ATTEMPT" | more

cat secure- yyyymmdd | grep "Accept" | more


8.     Show root user login history: lastb -f btmp-20201016 -Fadx root | more

9.     Show login history: last -aiF -f wtmp

10.  Check hosts file (if the attacker hijacks the DNS): sudo cat (mount drive)/etc/hosts

11.  Check autoruns script: sudo cat (mount drive)/etc/fstab

12.  Check cron job:

ls /etc/cron*

cat /etc/crontab


Online check

1.     Import/convert DD image to VMware and take a snapshot.

2.     Turn on the system.

3.     Check cron job: cron -l; sudo cron -l

4.     Check hosts file (if the attacker hijacks the DNS): sudo cat etc/hosts

5.     Check autoruns script: sudo cat etc/fstab

6.     Aureport commands:

aureport -au -i | more


aureport -au -i --success | more (To get authentication report for all the success attempts which was made.)


aureport -au -i --failed | more (To get authentication report for all the failed attempts which was made.)


aureport -l --success | more (To get success login information.)


aureport -l --failed | more (To get failed login information.)


aureport -l --success --summary -i | more (To get success login summary report for all the success attempts which was made.)


7.     Install and run chkrootkit

8.     Install and run rkhunter.

9.     Install and run clamAV

10.  Install and run lynis

11.  Install and run lnav.


Reference:

1.     https://digital-forensics.sans.org/community/downloads

2.     https://lnav.org/

3.     https://cisofy.com/lynis/

4.     https://www.redhat.com/sysadmin/3-antimalware-solutions


Monday, March 15, 2021

Making Image of A Laptop (Part 1)

1.     Description

The first step of the incident response is to image the suspicious system and get the hash of the DD image, which can prove the status of the suspicious system don’t get any modifications. Keep in mind that the less changes on the suspicious system, the better.

2.     Requirement

1)    USB sticker, 8G or greater. It will be used to boot the system with a customized Linux to make the image.

2)    USB External hard drive. Recommend 1T or greater. It will be used to save the image.

3)    PALADIN EDGE 64 (Version 8.01) ISO (https://sumuri.com/product/paladin-edge-64-bit/). The tool is available for FREE. However, it is highly recommended a donation to support the project.

4)    Rufus 3.8 or later (https://rufus.ie/)


3.     Make a bootable USB Sticker with Paladin Edge tool

1)    On a test laptop (not the suspicious laptop), download Paladin Edge 64-bit ISO from https://sumuri.com/product/paladin-edge-64-bit/

2)    Download Rufus from https://rufus.ie/

3)    Insert the USB sticker. Run Rufus, select the device and ISO file (Boot selection), leave other options as default setting. Click “Start” button to start making the bootable USB.


4.     Make DD image of the suspicious system

DD file is a disk image file and replica of a hard disk drive. It is widely used on Forensics investigation.

Keep in mind that the less changes on the suspicious system, the better.


1)    Shutdown the suspicious computer or make it sleep as soon as possible to maintain the environment.

2)    Find out how to boot from a USB drive on the suspicious laptop. Different laptop might have different methods.

3)    Use the ThinkPad T480s as the example:

4)    Attach the USB sticker to the system via any available USB port.

5)    Power on the system. Press F12 immediately as the Thinkpad logo appears.

6)    There should be a pop-up menu with a list of choices. Select the USB drive using the arrow key and press Enter.


7)    The system should now boot from the USB sticker (if not, try to disable “secure boot” on BIOS setup).


8)    On the screen, select the first option: “Sumuri Paladin Live Session – Forensic Mode” and press Enter.


9)    Wait until the OS loaded. Connect the External Hard Disk to an available USB port.

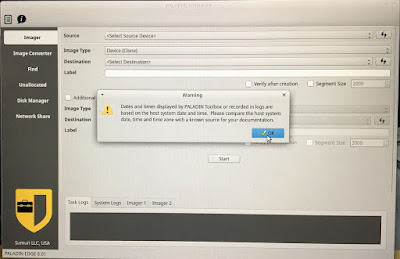
10) Click the first icon “Paladin Toolbox” 


11) There might be a warning about the time synchronization. Adjust the host system time if needed. Click OK button to continue.


12) Click “Source” dropdown list, select the Laptop’s hard drive.


13) Click “Image Type” dropdown list, select “DD(RAW)”


14) Click “Destination” dropdown list, select the External Hard drive.


15) Enter the label name, and click “Start”

16) After image is done. Open the .log.hashes to check the hash

17) Now you have a DD image with the hash. You can mount it as read-only hard drive to perform the forensics.

Also refer to:

1)    Making Image of a laptop – Summary (https://andyinmatrix.blogspot.com/2022/01/making-image-of-laptop-summary.html )

2)    Paladin Edge 64 (https://andyinmatrix.blogspot.com/2021/03/making-image-of-laptop.html )

3)    Kali Linux (https://andyinmatrix.blogspot.com/2022/01/making-image-of-laptop-part-2.html )

4)    FTK Imager (https://andyinmatrix.blogspot.com/2022/01/making-image-of-laptop-part-3.html )